Deploying Software With Connectwise Automate!
Connectwise Automate is a powerful RMM. And out of the box it offers a lot of great features. On top of the great features out of the box, plugins extend it. However, often you may want to deploy software automatically that doesn’t have any sort of built in integration. Fear not, the power of Connectwise Automate actually has you covered. Using this guide you will be able to mark clients for deploy, and have the software automatically pushed your agents, with no input on your end. New computers will automatically get the software. For the sake of this guide, I’m going to pretend to be deploying a software called Super Backup 64, but this can work for all kinds of software, and many of the basics can be reused for all kinds of automation task.
Setup
You need some basic requirements before putting everything together.
- The name of the software as Connectwise Automate sees it. To find this, install the software on one machine manually, or find one that it is already installed on. Go to the computer screen, switch over to software and note the name.
- Get a silent installable copy of the software. Most MSI files will work with the /qn parameter. This may take some Googling, or even a request into the software vendor.
- The name of the application that your employees are going to know it by. I know this may sound obvious, but being sure your employees will understand what they are doing is worth planning for.
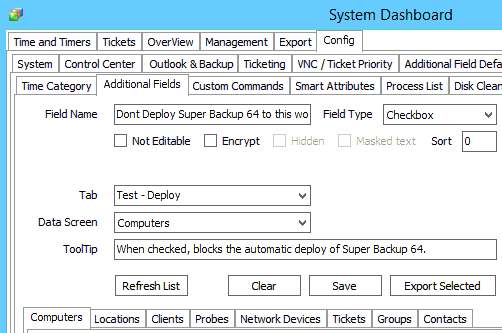
Setting up the EDFs
The core of this whole mess is EDFs. Using EDFs(Extra Data Fields) we are going to mark clients for deploy, but locations and computers for blocking deploy. So, let’s get down to business (to defeat, the Hun). EDFs can be created from the dashboard, under Configurations, then Additional Fields. We need the following.
- A workstation level checkbox EDF called “Dont Deploy Super Backup 64 to this workstation”. Of course you can modify verbiage if you want.
- A location level checkbox EDF called “Dont Deploy Super Backup 64 to this location”.
- A client level checkbox EDF called “Deploy Super Backup 64 to this client”.
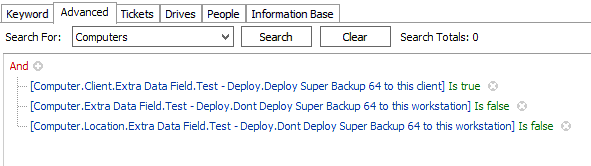
Create a search
Searches are somewhat complex in Connectwise Automate. First we need to figure out what our search will be. We are going to look for workstations that should have Super Backup 64 deployed on them. Go ahead an create the search, and call it something like “Super Backup 64 to be deployed”. So we will create a search the ensures that the client level EDF is checked, the location level EDF is unchecked, as well as the workstation level EDF. That will look something like this:
That’s all fine and good, but if you start playing around with it, you will notice that even workstations that already have the software installed are showing up in the search. Although you probably would never guess it on your own, filtering to only workstations that do not yet have the software installed is pretty easy. Take a look at this:
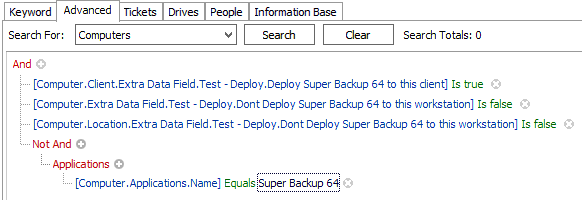
This method courtesy of gavsto.com
By separating out the not statement for the software check, we can make sure it doesn’t show up an entry for every piece of software that isn’t what we want. If you tried to do it the straight forward way of just saying “software.name <> ‘Super Backup 64’” you would get 20+ entries for every workstation, and the workstations that do have it deployed would still show up, because they have lots of software that isn’t called Super Backup 64.
Now that we have our search setup, let’s move on. Only one more hard part left, but we will save that for last.
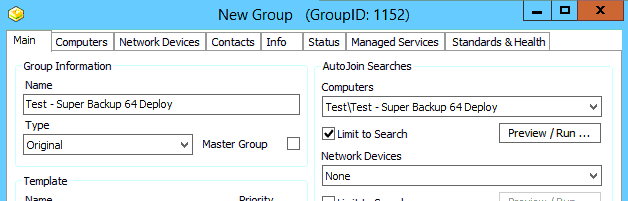
Create a group
Create a group called Super Backup 64 to be deployed. Once again, verbiage is optional, but you do want something that you can understand if you ever go back through your work in the future. On that group, set the search to the one you created before. This will populate the group automatically with computers that are set to deploy, aren’t blocked from deploy, and don’t already have the software installed. Now on to the final tough step.
Create your scripts
You want to create at least two scripts. One to deploy, and one to uninstall. Why are we creating the uninstall? Because we aren’t heathens and now is the time to do it. You won’t use it in this process, but you will create it, and you will thank yourself in a few years when you change software or need to decomm the client (check for a client decomm post coming to a blog near you).
The deploy script should have the following parts.
- Check to see if the software is already installed, if not, go to step 2.
- Transfer the installer to the workstation.
- Install the software
- Verify the software installed correctly.
- Delete the installer.
Of course, to do it right, you will want to log every step of the way, and not properly logging will make troubleshooting a lot harder down the road.
To deploy most software, we are going to use the following commands in the Connectwise Automate scripting interface.
- If software installed. This will check if the software matching the string (from the note we made earlier in the process). If it succeeds than it will go to the “Then” section of the script, basically stopping the script before it started.
- Script Note. Script notes serve two purposes. As it suggests, to leave yourself or others notes about how the script functions, but it also functions as labels, which are the targets of GOTO statements, and if statements outside of the built in initial if statement.
- File Download. This command transfers a file from the L:\Transfers\ folder to the target workstation. It will be used to move superbackup64.msi to the client server.
- Shell. This will run a command kinda like Win+R or cmd.exe. It runs as system, so you do have to be careful, some software really doesn’t like being ran when there isn’t a GUI available, even if it is a silent install.
- File delete. I don’t think I need to explain this one.
- Script Log. Script log will make the provided string show up in the Script page of the Computer Screen. It’s a good way to give feedback to the progress or result of a script.
Making it live
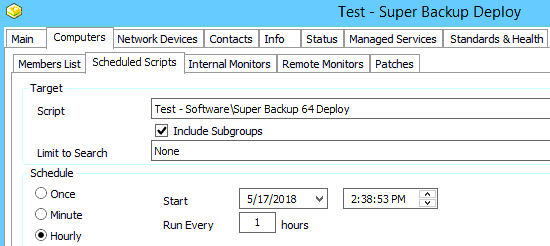
Congratulations. You’ve done it, you’ve created the system. There is but one small task left. To rig the script to the group. Once you do this, it will work. Go to the group, click the computers tab, then “Scheduled Scripts”. Add a new one, the one you just created, and schedule it to as often as you want. I normally do something rather often, like 1 hour. That way computers that come on and offline a lot should still get caught. Also, click the advanced box and make sure it is set for online computers only. You can’t deploy to an offline computer.
That’s it. Your software will now attempt to deploy on every workstation who’s client is marked for deploy, and location / self isn’t marked to block it. You can use this to deploy AV, backup software, Microsoft Office, you name it. If it can be silently installed, it can be silently deployed.